Multibooters
Dual and Multibooting with Vista
This site’s main aim is to understand Vista’s boot requirements,
particularly with regard to third-party boot managers and cloning.
The core boot files of Vista and Seven are the same but there are some operational differences. This page will examine the areas where the two operating systems deviate.
Both 32 and 64bit versions of Win7 have been tested and no differences relevant to installing other than minimum partition size required have been noted. Only common PC hardware has been used and findings have been reasonably consistent across extensive test installs, all of which were started by booting directly from the DVD or USBkey. No upgrades or installs started from inside a running Windows OS have been tried.
If an Active partition of FAT16/32 or NTFS already exists on the boot drive then the extra partition will not be created and the Win7 boot files will go to that current System partition, which will have its PBR (Partition Boot Record) re-written to start bootmgr at boot time. If there is a WinNT operating system already on that partition then the MS boot manager will be configured and you will get a boot menu on bootup. Any other type of OS on a current system partition will not be configured for dualboot and will no longer be available. If during the Win7 setup you choose to manually create a partition in unpartitioned space, then you will, if no other Active system partition is already present, get a notification message that an extra partition ‘might’ be created. “To ensure that all Windows features work correctly, Windows might create additional partitions for system files” In all test cases the extra partition was created. At no time during testing did setup ever create an extended partition or allow for the manual creation of one. If an extended is created before starting setup then Win7 behaves the same as previous WinNT. If an install is pointed to free space inside the extended or to a pre-made logical, the boot drive Active partition or the first suitable unhidden primary will be used as the system partition. A Quirk or Two If during setup you manually create a forth primary it will be accepted for install regardless of the status of the other three partitions. However if any are visible and suitable they will be subject to the same selection method as above and so may become the system partition. If the forth primary is created before booting from the DVD and it is not set as the active partition, then setup will look for the presence of an existing suitable active partition, if none is found the new forth primary will be set as the active one. If you have three unsuitable primaries and unpartitioned space on the boot drive and you direct setup to install Windows7 to a second or higher hard drive, then you will receive the same error message as shown above. Seems the setup routines still look at the availability of creating two primaries on the boot drive, even though it only needs to make one there.
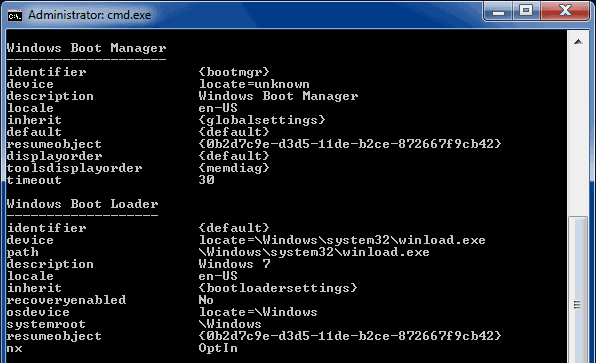
The instructions on the Vista Cloning Page for Generalizing the BCD can almost all be used with Windows7. Of course you should only generalize a BCD that is on the same partition as the Win7 or Vista operating system it is for. If you are using the MS bootmanager to dual or multiboot then you cannot generalize boot Objects in the BCD that are for operating systems on partitions other than the bootmanager partition, (the System partition). If you have separate System and Boot partitions for your Win7 install then you should not attempt to generalize its BCD. The new Win7 “System Reserved” mini system partition takes the BCD out of the OS and so you cannot generalize the BCD for such a Win7 install. If you need to clone or move Win7 to other partitions or drives then it would be easiest to avoid the use of a separate system partition, otherwise you will have to “re-specialize” the relevant boot Objects in the BCD after each OS move. New Element
The {memdiag} Object is also set to Locate, but the new WinRE boot Object is completely removed from the BCD, then replaced during first bootup of the syspreped operating system.
A misleading and unhelpful error message in Vista has been replaced in Seven with just an unhelpful message. Be thankful for small mercies I suppose, at least the new message will no longer send people down a blind alley. Now you are just “The boot selection failed because a required device is inaccessible.” See the MBR and Vista Boot Files pages for the likely cause of this message. Substitute it for “winload.exe ………is missing or corrupt”. Most times that people see the old message in Vista it has nothing to do with winload.exe being missing or corrupt. In Seven when I break any part of the boot sequence, including just removing or corrupting winload.exe, it is the new message that I see. I did however have an instance of the old message appearing and I can’t explain or repeat it. It happened just once on one machine while breaking and fixing BCDs, so I suspect it was a cross-over to a Vista install somewhere on one of the drives, but please let me know if you see it with Seven. feedback
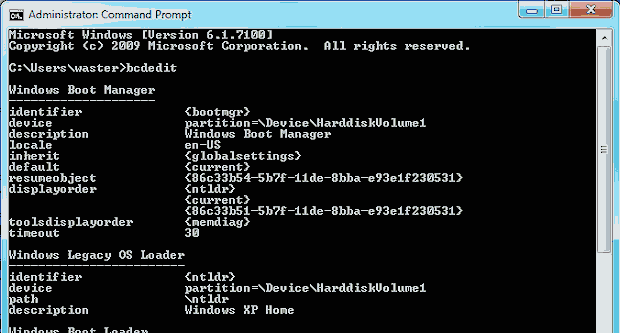
Inside Vista’s default BCD store there is always an ntldr boot Object already defined and waiting to be used for a dualboot arrangement with a legacy WinNT operating system. In Win7 the ntldr object is no longer a standard inclusion and will only be created if dualboot with an old WinNT is actually configured at install time. For people who go against the Microsoft grain and add XP after Vista, but still want to use the MS boot manager, it takes one command to add ntldr to the Vista boot menu. With Windows 7 it will require three extra commands: Of course this is only if you have installed XP entirely to its own partition and prevented it from taking over the Win7 partition. You also have to manually move copies of the XP boot files ntldr, boot.ini and NTDETECT.COM into the root of Seven. If you have allowed the creation of the new Win7 mini system partition then you would copy the XP boot files there instead. You would also have to set the {ntldr} device Element accordingly - X would then be the drive letter of the mini system partition. Of course if working from inside Win7 the mini partition won’t be assigned a drive letter so you will have to use the Volume number. If the mini partition is the first partition on the hard drive then it will be Volume1 The {ntldr} device Element would be the same as the {bootmgr} device Element.
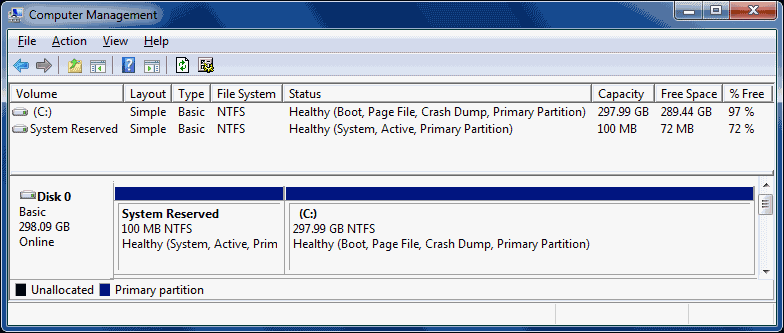
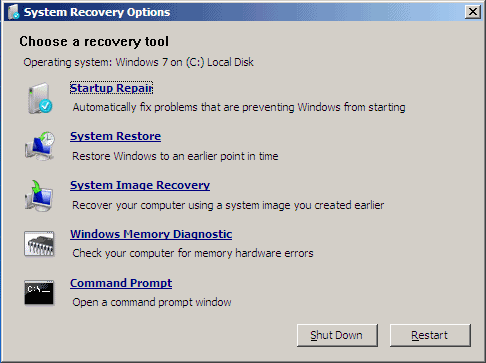
The Windows Recovery Environment (WinRE), the replacement to the old Recovery Console of legacy WinNT, is now included within the Windows7 operating system and can be started at boot time without the need for a DVD or the additional deliberate installing of WinRE on the hard drive. It should be the first boot item on the F8 advanced boot options menu 'Repair your Computer' and it will take you to the following System Recovery Options dialog box.
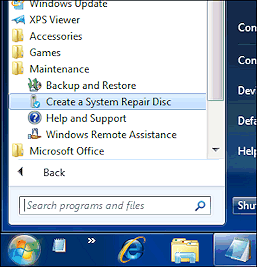
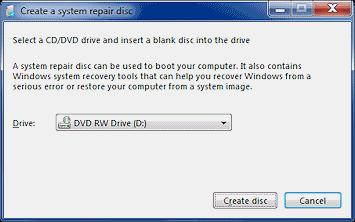
A welcome addition I’m sure for those who want or need it, but it is initiated through the BCD, so if you can’t boot Windows because of a BCD problem then you also won’t be able to start the recovery environment. When cloning or multibooting with a third-party bootmanager the most likely issue you are going to encountered will be a BCD one. Having the OS boot Objects in the BCD "Generalized" can overcome such OS boot problems, but you would also need to Generalize the WinRE Object in the BCD to retain access to WinRE. While this is possible it really is more trouble than it is worth and the more reliable solution is to have WinRE on CD/DVD or USB stick. If you have a full Win7 install DVD/USBkey then you are already covered, otherwise you can make a dedicated WinRE bootable CD or DVD from inside Windows7. Click the option on the start menu “Create a System Repair Disk” or open Backup and Restore and select it from there.
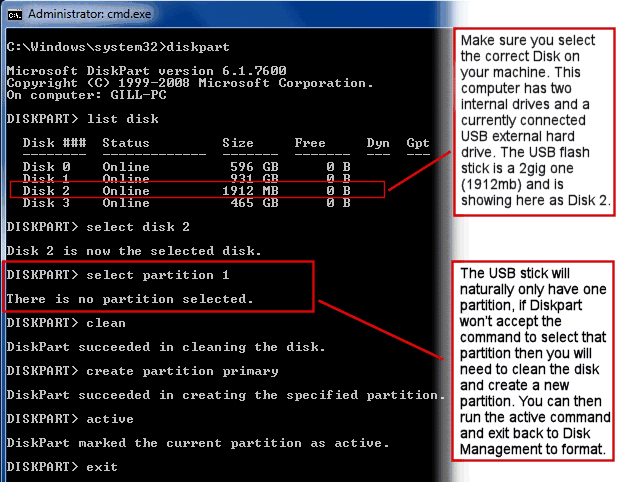
WinRE bootable USBkey If the stick won't boot or you have trouble selecting the partition in Diskpart then it probably means the partition structure or MBR on your stick is not what is required for it to be bootable. In Diskpart use the commands clean and then create partition primary, then the active command. You will have to format the re-created partition and you can go back to Disk Management for that.
Vista and previous WinNT operating systems won't tolerate two hard drives with the same Disk Signature, so one will be automatically changed during bootup of Windows. With XP and earlier this could sometimes cause problems when cloning hard drives but often it may have went unnoticed. With Vista however the disk signature acquired a new function which made it essential to even beginning the Windows boot process, which means a changed signature can result in major problems for most people. Windows7 handles duplicate disk signatures differently and does not auto-change anything during bootup. Instead it will essentially isolate one of the duplicate drives by not mounting it or any of its partitions in Windows. If you only have two drives then it will be the non-boot drive that will be fenced off and listed in Disk Management as Offline. 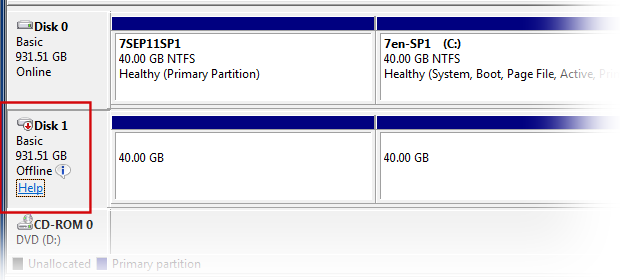
In our example Disk1 is an exact sector-by-sector clone of Disk0, hence both disks will have the same Signature.
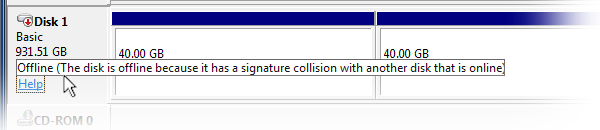
Hovering the pointer over the small Info Icon will reveal the collision message.
Right clicking just off of the info icon will give you a pop-up menu with the option Online, but be careful using it as it will instantly change the disk signature on the drive to a new random one. This will of course allow Windows to use the drive and mount and assign drive letters to all unhidden Windows compatible partitions, but it may also cause you problems with booting Windows operating systems on the drive. A changed signature will break the native Windows boot procedure, so if your intention in cloning the drive is to eventually make it the boot drive, then you may want to avoid a change to the disk signature. If however you have deliberately strayed off the Microsoft native path and have generalized your BCD files and are using a third-party bootmanager to handle any dual or multiboot setup, then the signature will no longer be a required part of the boot process and so changing it should have little impact, except perhaps with drive letter allocation. The Disk Signature and Windows Drive Letters
|
|||||||||


 -
-

