Multibooters
Dual and Multibooting with Vista
This site’s main aim is to understand Vista’s boot requirements,
particularly with regard to third-party boot managers and cloning.
Cloning VistaPossible partition issues - Preparing the BCD.
Vista is similar enough to previous versions of the NT operating system that many current cloning tools can still be used for Vista. The problems arise mostly from the new Vista boot files bootmgr and BCD, the way they use the Disk Signature, and the new Vista partitioning rules. If these factors are taken into account and adjusted for then the majority of pre-Vista tools are perfectly capable of doing the job. Of course many cannot be installed inside Vista, but they can be run from another OS or boot disk. Third party vendors of such tools are releasing Vista compatible versions, but some still have issues that have not been fully addressed. Cloning any WinNT OS requires adherence to certain rules to get a clean booting and independent clone that is not in some way cross-linked with the parent install. When using the Microsoft bootmanager with its reliance on separate system and boot partitions and non-default drive letters there are extra variables that can make successful cloning more tricky. I have tried to provide some information relevant to the MS bootmanager, but please be aware that the information here is mainly aimed at systems where the Windows installs are independent with all their boot files on their own partition and see themselves as the C: drive and their partition as both system and boot. If you don't know what I mean by 'independent', or you are using the MS bootmanager and don't understand how it operates, then you should read this guide before attempting to multiboot clones. (Be aware that EasyBCD and VistaBootPro are not independent bootmanagers but merely a graphical interface to the tools of the Microsoft bootmanager. If you have used either of these apps to configure boot options then you are using the MS bootmanager).
Fortunately there is a way to do this and it makes cloning Vista almost easier than any previous NT operating system. Thanks for this edit to the BCD goes to the man who first reported it. It's still not exactly clear what happens in the Vista bootmgr when this edit has been applied, but it has been used by a lot of people since 2006 with no reports of any problems or issues. It is not a published Microsoft fix, but it appears to be exactly the same edit as applied by Microsoft's own sysprep utility. The sysprep tool is designed to allow computer suppliers and IT pros to easily deploy Vista to numerous computers, by letting them install Vista once and then copy it to the other machines. That single install has to be 'generalized' so that when it is rebooted for the first time on another machine it is able to adapt to its new surroundings. My examinations of the 'generalized' BCD of a syspreped Vista install has shown that it employs the same edit as described here. If it's how Microsoft do it, then I think we can be fairly confident that it is a valid approach. If you don't want to generalize a BCD but just reset one to its new surroundings, then see the section below, Re-Specialize a BCD.
If you don't have the MS bootmanager configured to boot other OSes and the Vista you want to generalize is on a primary partition on the boot hard drive, then the easiest way to apply this change to its BCD is to boot into that OS and open a command prompt window, (how to do it from another OS or the Vista DVD is covered below). You might have to open the command prompt with elevated privileges by right clicking and choosing 'Run as administrator' then just type these separate commands, pressing Enter after each one. You should get a message after each. “The operation completed successfully”. If you get an error message from either of the first two commands then something is wrong with your set up and you may not be in a boot drive primary, or you might have the MS bootmanager configured, so you should go back and read the whole of the previous paragraph. Using the {default} identifier in the first two commands here can work equally as well, except you would have less of a chance of receiving an error message if you were changing the wrong BCD or the wrong boot Object. bcdedit /set {current} osdevice boot The {memdiag} line shown here is optional and only required if you ever want to use Vista's boot time memory tester. There should be one space between each block of characters. Once you have applied the first command you can use the up and down arrow keys to scroll through the previous commands you have entered, then back-arrow and edit, instead of re-typing much of the same again. Or you can copy and paste from this page. (Note:- the command line won’t recognise some pasted commands, but these are fine). Now no matter which partition or drive on that computer you clone this Vista install to it will boot without any further modifications (assuming you are using a Vista compatible bootmanager). The parent Vista will continue to function normally and I have yet to find a reason to return its BCD to the original condition. If you do restore the BCD then you will have to generalize it again before future cloning operations. You will also be more prone to boot problems if anything changes the hard drive disk signature or the partition offset. It's only when using the MS bootmanager that the BCD might have to point to a winload.exe that is not on the same partition as itself. When you are using a third-party bootmanager the BCD always needs to point to its own partition, so there is no need for specific drive and partition information. In fact this is also true if you only have one Windows, so why didn't MS make this the default behaviour until such time as their bootmanager was configured? Perhaps there is a reason yet to be discovered. Microsoft's sysprep tool does re-specialize the BCD during first boot of a generalized Vista. If you do want to 'un-generalize' your original BCD, or the one in the new clone, then see the section below, Re-specialize a BCD. Or you could make a backup of your original BCD before you start so that you can restore it after cloning. If you can't do this from another OS or boot disk then it can be done from within the OS with BCDEdit.exe and this is covered below in the section, Backup and Restore a BCD with BCDEdit.exe. If you also keep a backup of the generalized BCD then it can be used to replace the BCD in any future clones you make, although it will mean an extra step before you can boot the clone for the first time. A generalized BCD can also be used to replace the one in any Vista install on any computer that is proclaiming "winload.exe......is missing or corrupt"'. (In Windows 7 the equivalent error message is “The boot selection failed because a required device is inaccessible” see winload.exe.... is no longer missing).
When BCDEdit.exe is run it will by default modify the BCD on what it sees as the System partition, see BCD is Always Open. It is possible however to direct BCDEdit.exe to work on any BCD on any partition or drive – even logical partitions. The easiest way to achieve this is to allow the partition with the BCD you want to change to be seen by the Windows OS you are booted into and so be assigned a drive letter, then prefix every command with the path to the desired BCD. So if for example your target BCD is on drive E: and it is where expected in the boot folder in the root of that partition, then the prefix will be /store E:\boot\bcd If you type just bcdedit at the command prompt you will be shown the contents of the system partition BCD, if there is one. If you type bcdedit /store E:\boot\bcd you will be shown the contents of the BCD on the E: drive. Now an important thing to understand is that the BCD does not hold any record what-so-ever of drive letters that are allocated to any OS or partition. It is BCDEdit.exe itself that will put drive letters into the displayed contents of the BCD. The BCD identifies partitions by their offset, and BCDEdit.exe will simply put a drive letter in there to make it easy for you to see what partition that is. It shows you the drive letter that the Windows OS you are booted into has given to that partition. So, do not be concerned that drive letters displayed by BCDEdit.exe do not seem to relate to the drive letter that an OS considers itself to be. So to 'generalize' your desired BCD you need to use these commands, replacing the X with the drive letter of the partition the target BCD is on. You have to use the {default} identifier here because this was not the BCD that was used to boot the OS that you are currently in. (If you have the MS bootmanager configured for dual/multiboot in the OS on the target partition then remember that the {default} identifier will change the default OS. If you have made that a legacy Windows then the first line here is not applicable to the ntldr and so will give you an error. The second line will change the ntldr Object, not Vista's). bcdedit /store X:\boot\bcd /set {default} osdevice boot The commands don't have to be entered in the order displayed here, it is just the order that gives you some error control as well as giving you the least amount of editing to the next line if you use the up-arrow key to paste in the previous command. The ntldr line can be included for Vista if required, for Windows 7 see - The ntldr boot Object in the BCD If you do have the MS bootmanager active on the target partition and you can't change the default item in its bootmenu to make the first two commands work for you, then you can still proceed by using the specific GUID for the Vista install. To discover the GUID enter this command bcdedit /store X:\boot\bcd /v to see the contents of the BCD store. The GUID you want is the 'identifier' for the 'Windows Boot Loader' object. If you are working from a pre-Vista OS then you obviously won't have BCDEdit.exe inside that version of Windows. The easiest solution is to take a copy of it from the system32 folder of the Vista install and place it inside the system32 folder of the OS you are working from. Or you can just tell the command prompt you are running to use the BCDEdit.exe where it is in the other OS, but this will require another prefix to all your commands. X:\Windows\system32\ where X is the drive letter of the OS where BCDEdit.exe is. Most likely this will be the same drive as the BCD store you are editing, so both Xs in the commands will be the same.
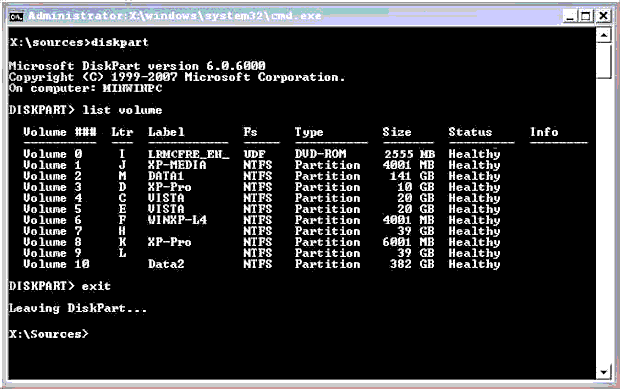
If you are using the MS bootmanager and want to add other OSes to its bootmenu then you can use the DVD auto repair feature or the bootrec.exe tool, which if you just have a standard and simple set-up can sometimes work quite well. This won't generalize your BCD but fix it in the standard 'Specialized' form. If on the other hand you have independent installs of Windows and a third-party bootmanager then the auto repair is best avoided as it will try to configure the MS bootmanager and could make a complete mess of your system. If you are not trying to generalize a BCD but just fix the one in an independent clone then the bootrec tool can be used for primary partitions on the boot hard drive. Set the target partition as the Active one on the disk before you start and then once at the DVD command prompt run bootrec /rebuildbcd and of the Windows installs it finds and offers to add to the BCD accept only the C: drive, as that is the letter the DVD will see the Active partition as. This will make a new specialized BCD in the clone, but it might be lacking some of the other boot Objects like {ntldr}, {memdiag} and the debug options. To generalize any desired BCD we need to get to a command prompt and run BCDEdit.exe. There are two ways to reach a command prompt from the DVD and one involves going past the auto repair feature. When you get to the "Install now" screen you will see the 'Repair your computer' option in the lower left, if you select this the auto repair will most likely scan the machine and offer to fix the problems it has found. You want to be careful to decline and click No and then click Next to go to a list of options, one of which will be the command prompt. Rather than go through the auto repair and risk clicking the wrong button, continue with the install as normal by clicking 'Install Now' and at the very next screen where you are asked to enter your product code press Shift+F10 and the command prompt will open, (with Windows 7 Shift+F10 will work from the very first screen). Now the first thing to do is determine what drive letter the DVD considers your target partition to be. Again this may bear no relation to any drive letters Windows has assigned. Type diskpart and you will go to the DISKPART> prompt. Enter list volume and you will get a list of all the partitions (or volumes) on every drive, but only those partitions that are not hidden, so you have to make sure your target partition is un-hidden before you boot from the DVD. You should get a list of all accessible partitions with a drive letter assigned to each.
The only sure way to identify your partition is by its size or its volume label, so if you don't think size will be enough then make sure it has a unique label. This is displayed in Windows next to the drive icon in My Computer and will just say (Local Disk) if no volume label has been set. Right click on the drive icon and choose 'Rename' and change it to something unique. (Warning for Win2K users: never change the Volume Label of a 2K operating system other than from inside that OS). Once you have determined your drive letter from diskpart then exit by typing exit and when back at the X:\Sources> prompt, the commands to generalize the BCD are the first group shown in the section directly above this one, Generalize a BCD While Working From a Different OS
If you want to change a generalized BCD back to a specialized one, or just repair one so that it is specialized for its new surroundings, then it only takes replacing the 'boot' component in the BCDEdit.exe commands with specific partition drive letters. To fully un-generalize a BCD of an independent Vista that you are booted into then you need these five commands, where X is the drive letter that the OS sees itself as. An error from the first two commands here will tell you that there is something wrong with your set-up and you are not working on the BCD or the Object you think you are. But remember that the absence of an error message is not a guarantee that you have got things correct. If you have not yet read the beginning of this page you should do so before proceeding. (The {memdiag} command is only required if you ever want to use the MS boot-time memory tester. The {ntldr} command is optional for Vista and won't apply to Windows 7 unless you actually have a legacy OS installed and you are using the MS bootmanager). bcdedit /set {current} osdevice partition=X: To specialize a BCD while working from another OS or the DVD your commands will be as follows, where the drive letter of the partition is the same as the drive letter in the path to the BCD. That is both Xs have the same value. (These are also the commands you would use from inside an OS if you were having trouble getting BCDEdit.exe to target the OS's own BCD). bcdedit /store X:\boot\bcd /set {default} osdevice partition=X: Remember, you are not setting drive letters in the BCD, you are simply telling BCDEdit.exe which partition you mean, in this case you mean the partition the Vista install is on.
If you do have trouble with the resume object correctly resetting or just want to do it yourself then here is the command. First make sure that hibernation is indeed turned on as described at the bottom of this section. There is no shorthand identifier for this one so you have to use the full 32 digit GUID number. Run bcdedit /enum all and the GUID you want is the 'Identifier' for the Resume from Hibernation object. You will almost certainly be doing this from inside the OS you are having trouble with so it will be possible to copy and paste the GUID instead of having to type it out. To copy from the command prompt window right click anywhere and from the popup menu click ‘Mark’ then highlight your text and either right click or press Enter to copy. Or you can click ‘Select All’ and paste everything into Notepad or whatever. If your BCD is generalized then the command will be: If the BCD is Specialized then it is this, where X is Vista's own drive letter. Once hibernation has been used for the first time a new line (Element) called 'resumeobject' will appear in the bootmgr Object, and also a new one called 'filedevice' in the resume Object. The filedevice Element in the resume Object uses the signature and offset information and so has to be set correctly, but we never have to do this one ourselves because it is reset every time hibernation is used. It is always specialized, so there would be no point in generalizing it. It is this auto specializing of the filedevice Element just before hibernation shuts the system down that is part of the cause of hibernation or hybrid sleep problems in independent Vistas on second or higher hard drives or logical partitions. If your bootmanager is not fully Vista compatible then the wrong BCD store can be set for resume, see BCD is Always Open. If you do want hibernation to function in independent Vista installs on anything other than boot drive primary partitions, then I have found no solution other than making sure your bootmanager is fully Vista compatible. The new Hybrid Sleep in Vista also uses the hibernation function and so partly suffers from the same problem. Hybrid sleep is hardware dependent so it may not be available as an option on slightly older machines. If you do have it turned on then you will not have hibernation as an option on your shutdown menu. You have to set hybrid sleep to Off before hibernate will be available.
If you want to create a backup of a BCD from inside the Vista OS that is holding it open, then the command will be as follows – where X:\folder\ is the target drive and folder where the back-up will be saved to. bcdedit /export X:\folder\bcd If for example you create a new folder in the root of the C: partition and call it boot2, then the path would be C:\boot2\. If you want to send the BCD backup to your documents folder on the C: drive then the whole command would be bcdedit /export C:\users\yourname\documents\bcd. If you include any spaces in the folder name or the name you give to the BCD back-up file you have to enclose the path and file name in quotation marks: e.g. bcdedit /export “C:\boot2\bcd bkup”
If you make a complete sector-by-sector clone of a drive containing Vista then you will duplicate the disk signature and the partition offset and so you will not have to modify the BCD to get Vista booting, because it will already contain the correct information. Be aware however that you cannot have two hard drives on the same computer with identical disk signatures. If you boot any WinNT operating system when there are two drives with the same signature then one of the signatures will be automatically changed. If you do clone a Vista drive in this way and need both drives connected at the same time then generalizing the BCD before cloning, or re-specializing or generalizing the BCD on the affected drive, will fix the problem. This has always been an issue when cloning entire hard drives containing WinNT, but before Vista a signature change could in many cases not cause an issue and so may have went unnoticed. (Windows7 now reports when there is a Disk Signature "Collision") Cloning Vista for anything other than backup or recovery may violate your EULA
|
|||||||||